VR Interaction Framework
Welcome! These docs will get you up and running with the VR Interaction Framework. If you come across any issues, please don't hesitate to contact me for support, or come join the Discord community!
Overview
The VR Interaction Framework is a collection of scripts and prefabs to help you develop interactions in VR. It is intended to make it easier for developers to create their own interactable objects and be productive quickly.
There are multiple prefabs available to provide you with examples of common VR interactions. These range from simple blocks and balls to switches, levers, weapons and rocket arms. You are encouraged to experiment with these, inspect the scripts to see how they were made, and create your own.
Installation
As of version 1.5, VRIF no longer requires Oculus Integration, which makes installation relatively straight-forward. Just start a new project with Unity 2019.4LTS, import the VRIF asset from the Asset store, and you should be good to go. Some devices may need an extra step or two.
If you're importing VRIF into an existing project, or just want to know how to set VRIF up from scratch, below are some notes for specific platforms :
Unity 2019.4LTS or Unity 2020?
I recommend using 2019.4LTS as it is stable and has the widest support. However, I also understand the desire to want to use the latest and greatest :) Maybe there is a new editor feature you can't live without, a performance update you'd like to to test, or you just want to use that lovely new dark theme that's available!
There are a couple of considerations to keep in mind with 2020 :
- There is currently no OpenVR plugin available through the package manager. The OpenVR Desktop Plugin is only available for Legacy, which 2020 does not support. You would need to use SteamVR to support these devices.
- If you decide to upgrade a project to 2020, make sure to disable all Legacy VR packages first, otherwise 2020 may be unable to remove these packages automatically and cause a conflict.
XR Management vs. Legacy
This largely depends on which devices you need to support or are developing with, as well as which editor version you are using. If you are using 2019.4LTS you can pretty easily switch between the two. However, in Unity 2020 you are locked into using XRManagement. While XRManagement is the path forward for Unity, the lack of built-in support for OpenVR could be a deal-breaker depending on your target devices.
Device Support
Oculus Quest
There are a few recommended settings to use when targeting the Oculus Quest :
-
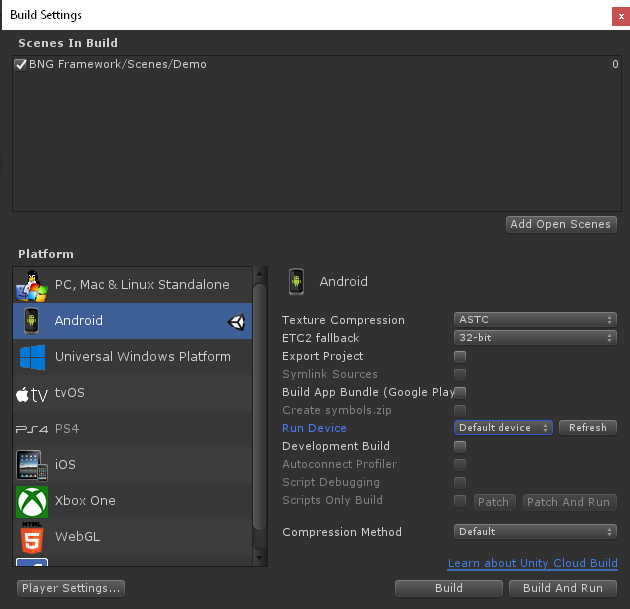
Change your Build Settings (File -> Build Settings) Target to "Android". Make sure Texture Compression stays at "ASTC".
-
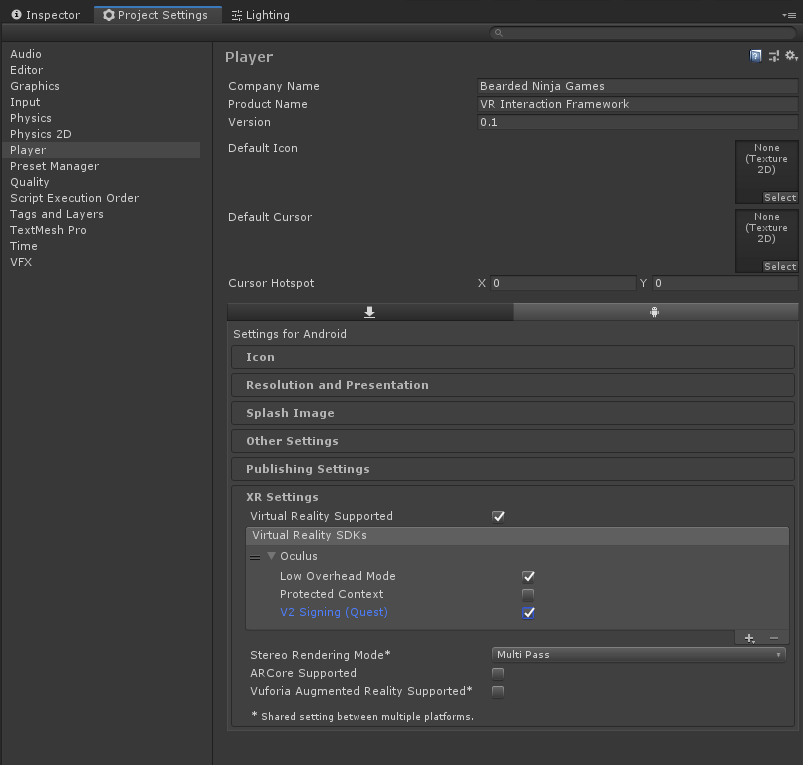
For Legacy input : go to Edit -> Project Settings -> Player. Under "XR Settings" make sure "Virtual Reality Supported" is checked, and that the Oculus SDK has been added.
Also for Legacy input : Make sure you have the Oculus Desktop Package and the Oculus Android Package installed. This will allow you to build to the Quest and use Oculus Link.
For XR Management, you only need to have the Oculus plugin installed.
Oculus Quest should enable V2 Signing; Low Overhead Mode is optional.
-
Under Project Settings -> Player, expand the "Other Settings". Make sure "Vulcan" is not enabled under Graphics API's if you are using a Unity version < 2019.3, otherwise an error may be thrown.
Set the "Minimum API Level" to Android 4.4 'Kitkat' (API Level 19)
Make sure API compatibility level is .NET 4x.

-
I recommend changing your Fixed Timestep (Edit -> Project Settings... -> Time) to 0.01388889 if you are targeting the Oculus Quest. This matches the HMD's framerate (1/72). For Oculus Rift you can try 0.0111111 (1/90)

-
I also recommend disabling shadows (Project Settings -> Quality) and setting Pixel Light count to 1 if you are targeting the Oculus Quest.
-
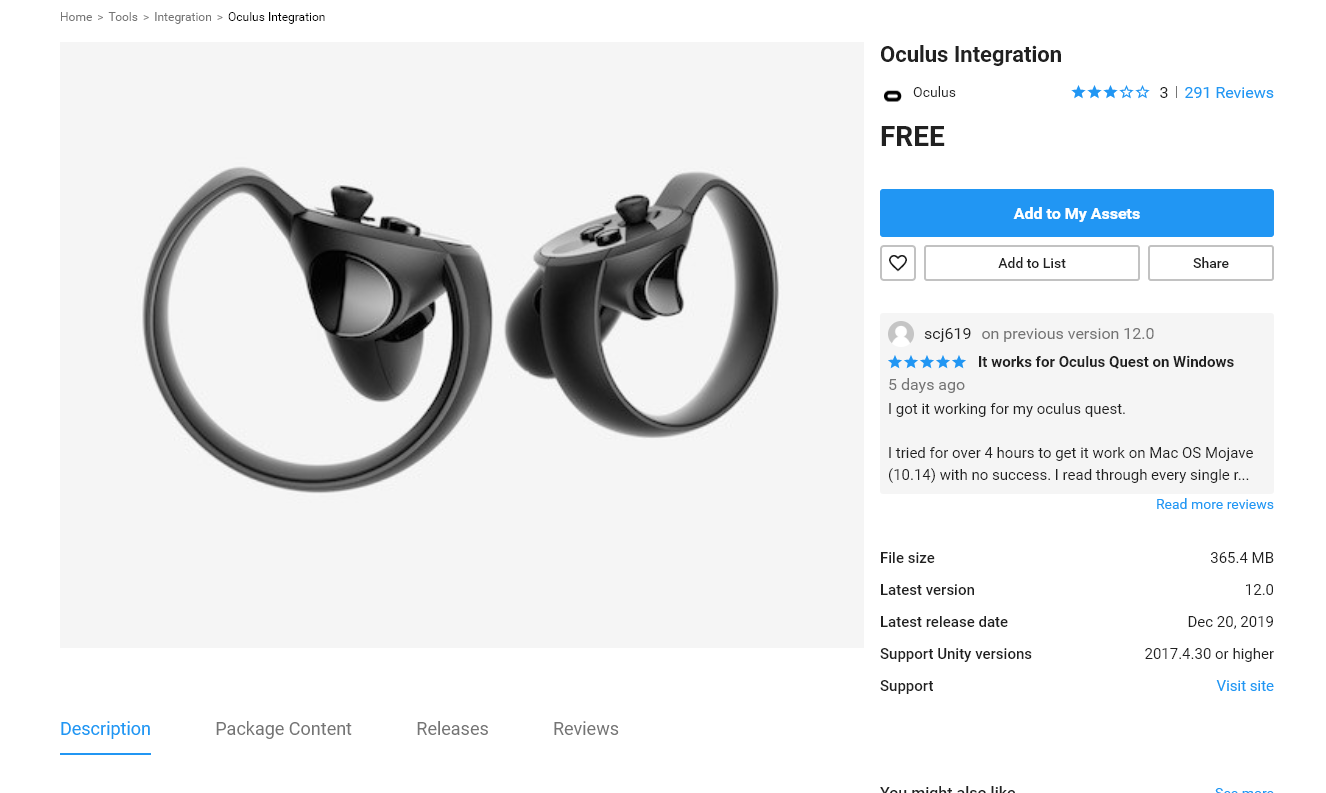
If you want access to Quest handtracking make sure to download the Oculus Integration from the asset store, and import the package into your project. Once that is installed you can extract the integration package and test out the demo scene.
Unity may prompt you to update new plugins restart the editor - say yes to these prompts.
Building for OpenVR
OpenVR Devices
Unity 2019.3 and above now offer XRInput which provides standardized input across a variety of devices. However, OpenVR is not currently supported in Unity XR Management. You will need to use the Legacy system to access OpenVR, or the SteamVR asset.
In order to support OpenVR devices such as the HTC Vive, you will need to install the OpenVR Desktop package (Window -> Package Manager) and add the SDK in your project settings (Edit -> Project Settings -> Player -> XR Settings) :

HTC Vive
Unity can support the HTC Vive through either the OpenVR package or SteamVR.
- Make sure the OpenVR Desktop package is installed and listed under your SDK's at Player Settings -> XR Settings -> Virtual Reality Settings, and that "Virtual Reality Supported" is checked.
- The Vive Wand controllers have a slight offset due to how the controllers are physically angled (about 15 degrees forward, for example). You may need to adjust the angle that the hand models are tracked. See the ControllerOffset component for a solution to this problem, so you don't have to change the objects manually.
Windows WMR
WindowsWMR devices can be supported through either the OpenVR package or SteamVR.
- Make sure the OpenVR Desktop package is installed and listed under your SDK's at Player Settings -> XR Settings -> Virtual Reality Settings, and that "Virtual Reality Supported" is checked.
- Some WMR controllers may have a slight offset due to how their position is reported. You may need to adjust the angle that the hand models are tracked. See the ControllerOffset component for a solution to this problem, so you don't have to change the objects manually.
Valve Index
The Valve Index is not currently officially supported. However, you should be able to get this device working by installing the SteamVR asset and using the provided bindings, as described below :
Using the SteamVR SDK
- Make sure no conflicting plugins are installed in the package manager - remove any OculusSDK and even OpenVR plugins before installing SteamVR.
- Download and import the SteamVR SDK from the Asset store. Once imported, SteamVR will prompt you to generate keybindings which you may do.
- VRIF includes some keybindings for various SteamVR devices. Extract the SteamVR package from /BNG Framework/Integrations/SteamVR and allow Steam to register these custom bindings.
- On the player object add the "SteamVR_Activate Action Set on Load" component and drag in these new bindings.
- Navigate to Window -> VRIF Settings and check the "SteamVR" integration checkbox. You can also manually do this by adding "STEAM_VR_SDK" (no quotes) to your Scripting Define Symbols : Edit -> Project Settings -> Other -> Scripting Define Symbols
- Finally, make sure "SteamVR" is selected as the Input source on the InputBridge.
Tags and Layers
While it is not required to have any specific Tags or Layers for VRIF to work, it is recommended to separate the Grabbable and Player components into their own layers so you can have their collisions ignored. This helps certain interactions such as trying to pull a drawer open that then collides with the player's capsule.
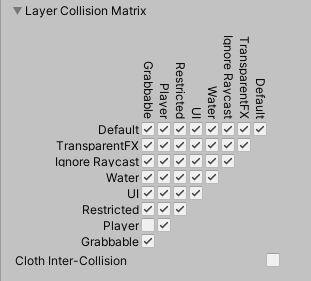
VRIF's layers are setup as "Grabbable" and "Player" by default like so :

You may then set the layer's to have their physics ignored by modifying the Physics Collision Matrix (Edit -> Project Settings -> Physics) :
I also recommend having a Tag on the Player, and another Tag on the CharacterController if you need to quickly find the main player.
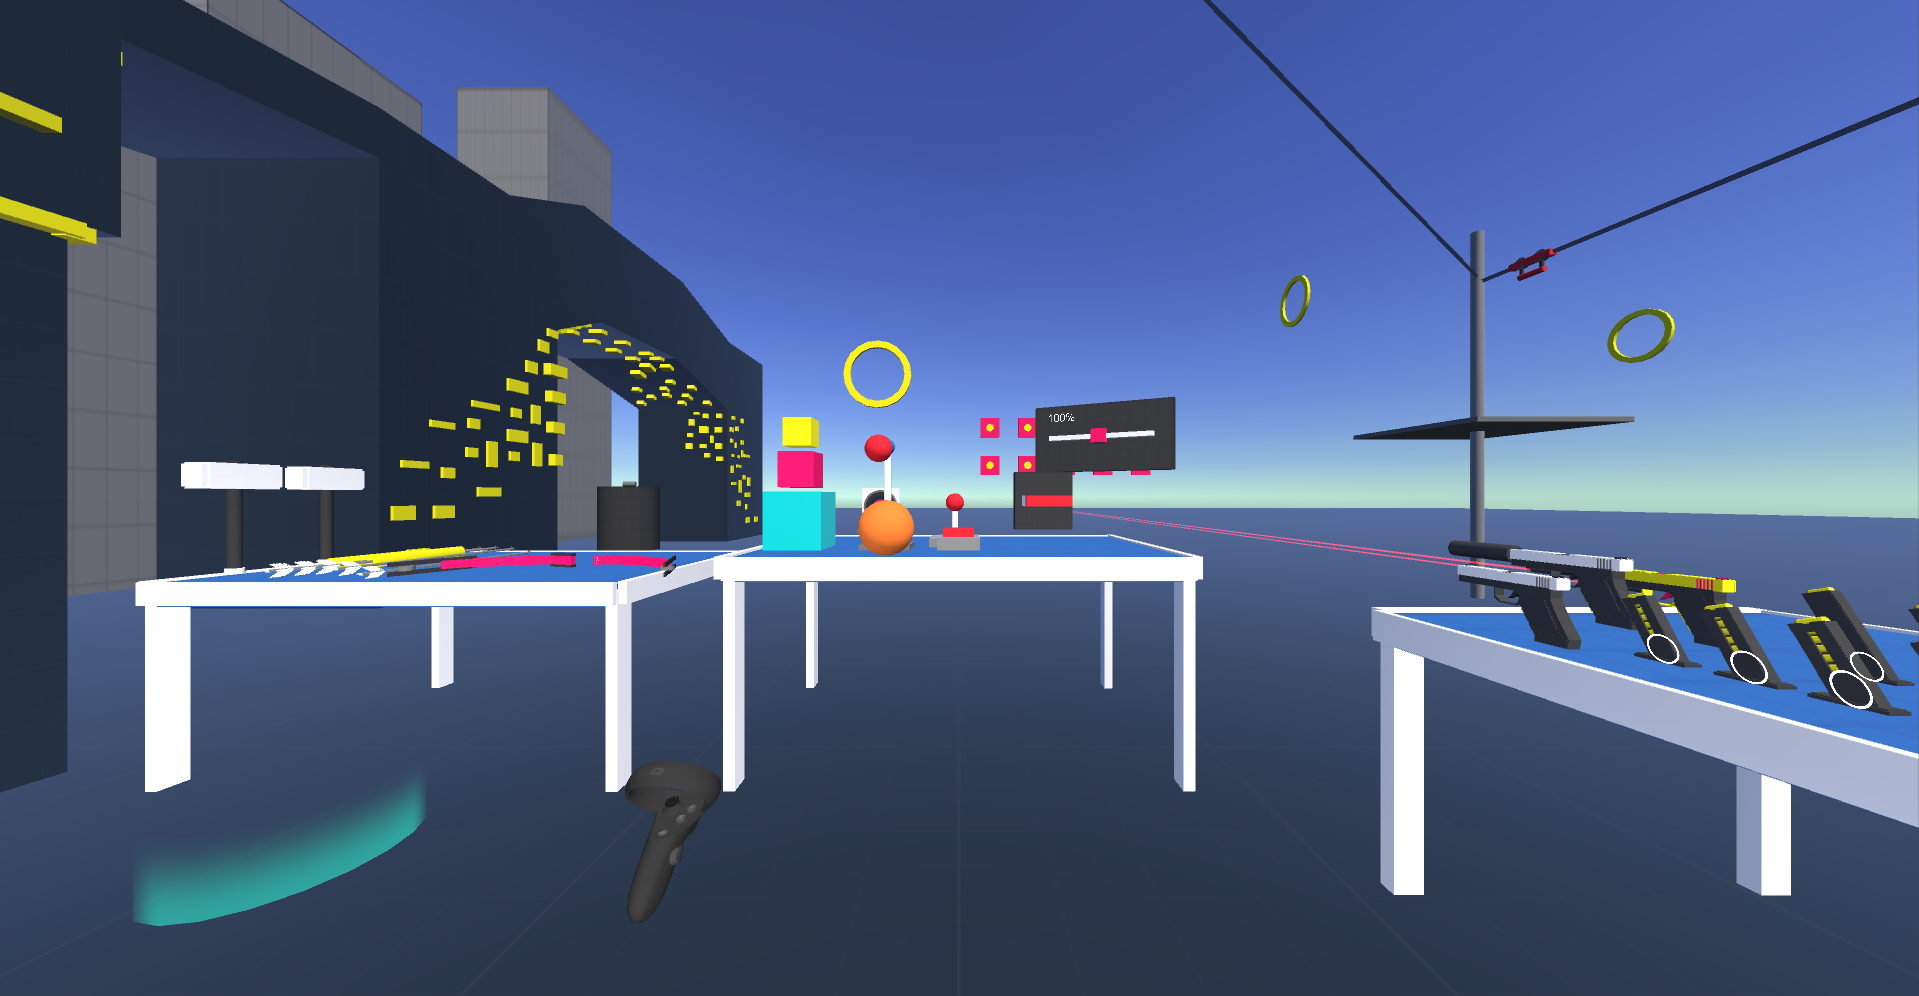
Demo Scene /Scenes/Demo
The demo scene is meant to provide a unified place to test out how different object interact with each other, while keeping an eye on general performance. You can grab objects, interact with switches, levers, and buttons, and even do some climbing and combat.
Check out the script /Scripts/Scenes/Demo/DemoScript.cs for some additional code that is used in the demo scene.
The demo scene will be updated regularly with new features, so I wouldn't recommend saving your modifications to that scene. Instead, copy the prefabs over to your own scene, or just rename the scene.
Core /Scripts/Core/
The following components make up the core of this framework. The two main components are Grabber and Grabbable. The Grabber is in charge of picking up Grabbable objects that reside within it's Trigger. Grabbables designate items as grabbable by these Grabbers and allow you to tweak parameters such as grab offsets, how to handle physics, and things of that nature.
Grabber /Scripts/Core/Grabber.cs
The Grabber is a Object the contains a Trigger Collider that is in charge of picking things up.
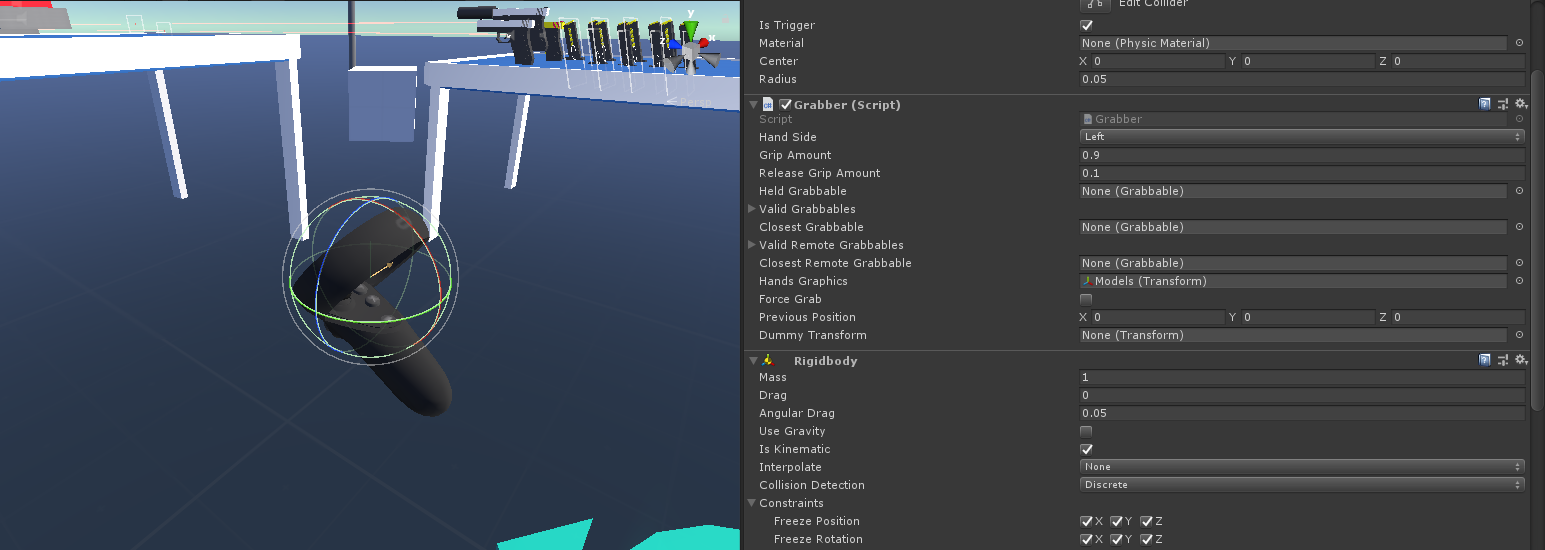
- Hand Side (Left, Right, None) Set to Left or Right if you are parenting this to a Controller. Set to None if this is not used on a Controller.
- Grip Amount (0-1) How much Grip is required to be considered a grab. Ex : 0.9 = Grip is held down at least 90% of the way
- Release Grip Amount (0-1) How much Grip is required to be considered letting go of a grab. Ex : 0.1 = Grip must be greater than or equal to 10% of the way down. This value should be lower than Grip Amount. Provides a way of having a zone for grip / releasing.
- Held Grabbable (Grabbable) The Grabbable that is currently being held. Null if nothing is being held.
- Hands Graphics (Transform)The parent object that holds any number of Graphics used to represent hands. This transform should be for the graphics / animations only. If a Grabbable's property 'ParentHandModel' is true, this transform will be parented to the Grabbable. On release the transform will return back to the Grabber's center.
- Force Grab Force the Grabbing of this Grabber. Useful for debugging within the Editor to simulate holding down a grab button.
- Force Release Force the Release of this Grabber. Useful for debugging within the Editor to simulate the release a grab button.
Grabbable /Scripts/Core/Grabbable.cs
The Grabbable Component let's Grabbers know they can be picked up. There are many settings to help you tweak it's functionality to your liking.
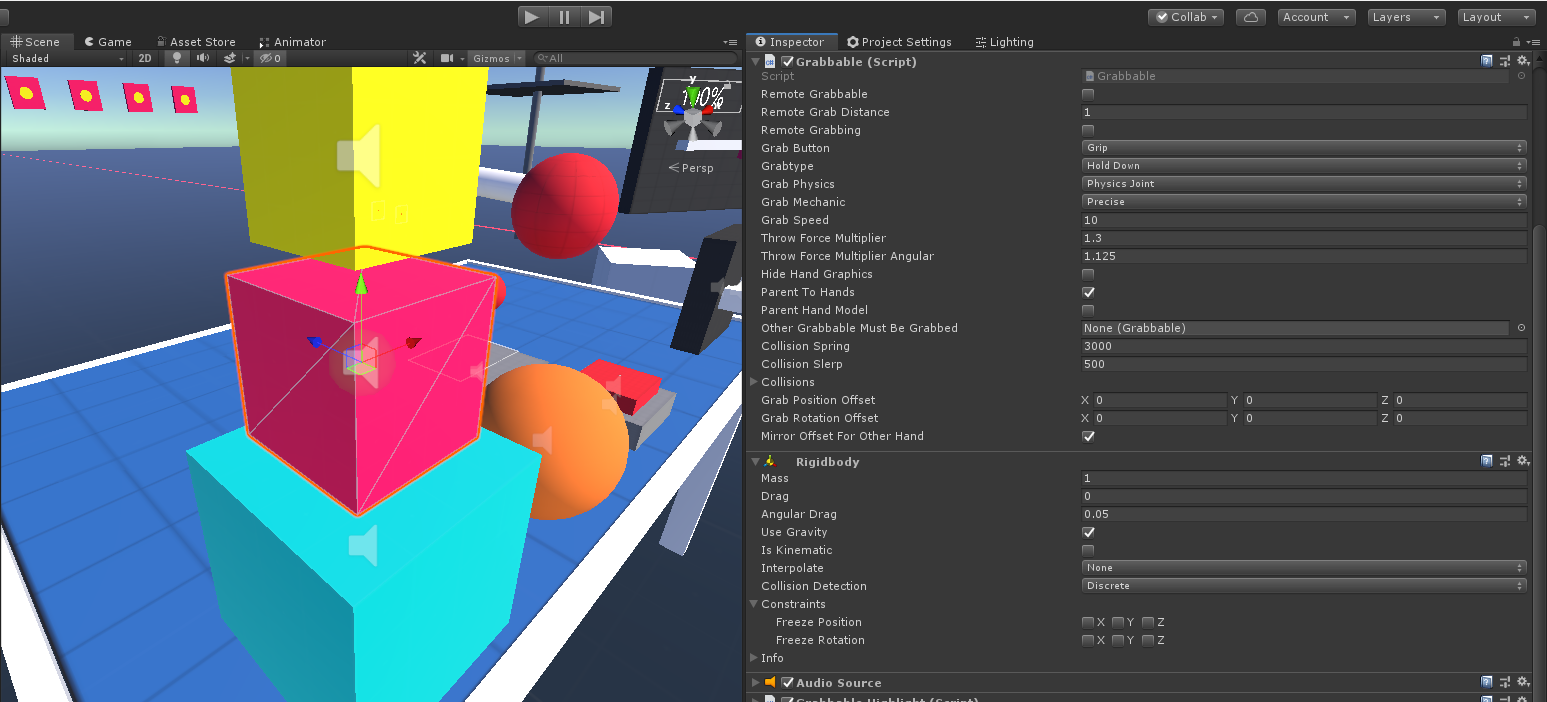
- Remote Grabbable If true the object will be eligible to be picked up from far away. Remote Grabbables are found by being within a RemoteGrabber Trigger.
- Remote Grab Distance If "Remote Grabbable" is true, then the object can be remote grabbed at a maximum of this distance.
- Remote Grabbing True if the object is currently being moved towards a Grabber
- Grab Button This property allows you to specify which button needs to be pressed to pick up the object. Typically this would be Grip, but sometimes you may want to use Trigger (like an arrow, for example).
-
Grab Physics Allows you to specify how this object will be held in the Grabbers
-
Physics Joint A ConfigurableJoint will be connect from the Grabber to the Grabbable. This allows held objects to still collide with the environment and not move through walls / other objects. The joints rigidity will be tweaked depending on what it is colliding with, in order to make sure it aligns properly with the hands during interaction and movement.
-
Kinematic The Grabbable will be moved to the Grabber and it's RigidBody will be set to Kinematic. The Grabbable will not allow collision from other objects and can go through walls. The object will remain firmly in place and is a reliable way of picking up objects if you don't need physical support.
-
None No grab mechanism will be applied. Climbable objects are not grabbed to the user, for example. They remain in place when grabbed. No Rigidbody is necessary in this case.
-
-
Grab Mechanic Specify how the object is held in the hand / Grabber
-
Precise The Grabbable can be picked up anywhere
-
Snap The Grabbable will snap to the position of the Grabber, offset by by any Grab Points that have been specified..
-
- Grab Speed How fast the Grabbable will Lerp to the Grabber when it is being grabbed.
- Throw Force Multiplier Angular The Grabbable's Velocity will be multiplied times this when dropped / thrown.
- Throw Force Multiplier The Grabbable's Angular Velocity will be multiplied times this when dropped / thrown.
- Hide Hand Graphics If true, the Grabber's hand graphics will be hidden while holding this object.
- Parent to Hands If true, the object will be parented to the hand / Grabber object. If false, the parent will remain null / untouched. You typically want to parent the object to the hand / Grabber if you want it to move smoothly with the character.
- Parent Hand Model If true, the Grabber's Hand Model will be parented to the Grabbable. This means the Grabber and it's Hand Graphics will be independent. Enable this option if you always want the hands to match with the grabbable, even if the hands don't align with the controller. See the demo scene weapon for examples.
- Other Grabbable Must be Grabbed If this is not null, then the specified object must be held in order for this Grabbable to be valid. A weapon clip / magazine inside of a gun is a good example. You may only want the magazine to be grabbable if the pistol is being held.
- Collision Spring The amount of Spring force to apply to the Configurable Joint during collisions.
- Collision Slerp The amount of Slerp to apply to the Configurable Joint during collisions.
- Collisions A list of objects that are currently colliding with this Grabbable. Useful for debugging.
- Grab Points A list of Grab Points that determine where the object will be placed in the hand.
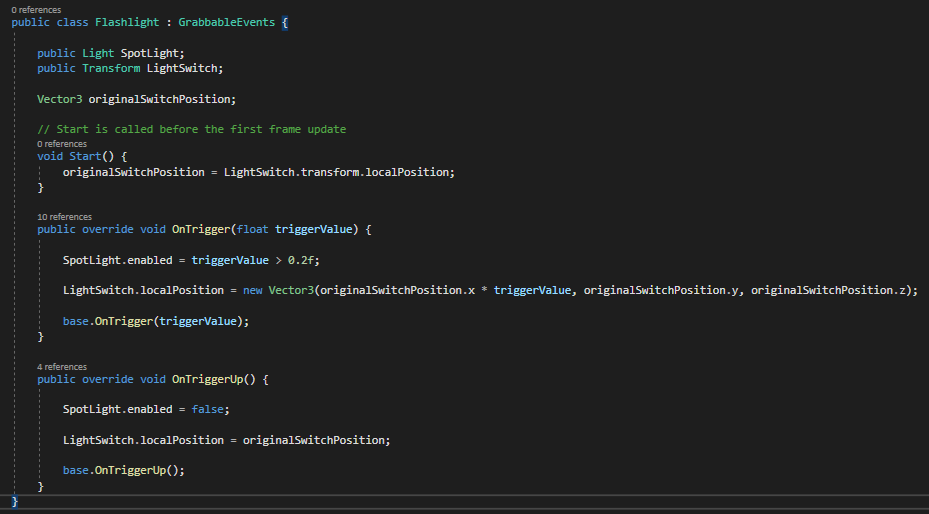
Grabbable Events /Scripts/Core/GrabbableEvents.cs
You can extend GrabbableEvents class in order to respond to all sorts of events that happen to a Grabbable. This is how many of the included prefabs are built, by either responding to Grabbable Events of by extending the Grabbable class to customize behaviour.
Check out /Scripts/Components/GrabbableHaptics.cs to see how easy it is to haptics to an object when it becomes a valid pickup.
Check out /Scripts/Extras/Flashlight.cs to see for a simple example on how to turn a light on and off. Hello World!
Another way to respond to these events is to add the GrabbableUnityEvents component to a Grabbable object. Then you can drag in your function to any event you wish to respond to :

Climbable /Scripts/Core/Climbable.cs
Climbables are modified Grabbable objects that keep track of a position for the Character Controller to offset from. See the custom included CharacterController.cs to see how climbing works.
Climbing is accomplished by checking where the controller is this frame, and then offsetting the character position by that amount.
Multiple Climbing objects can be held at once (one in each hand). You can set a "BreakDistance" if you want to prevent the players hands from getting too far away from a hold.
Input Bridge /Scripts/Core/InputBridge.cs
The Input Bridge serves as the primary class to go to for checking controller input such as position, velocity, button state, etc.
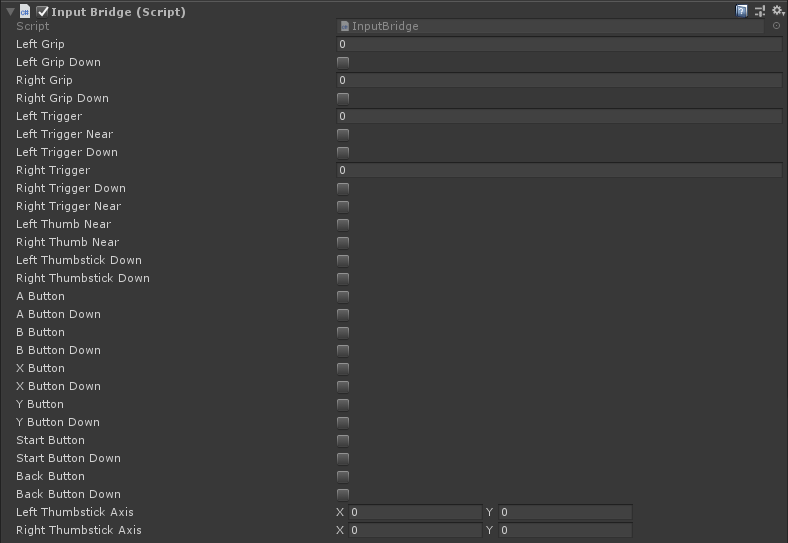
It is recommended to use this instead of something like OVRInput because this class can be more easily updated and account for other Input SDK's in the future.
General
Additional information on the included prefabs and scripts.
Buttons, Switches, and Levers
Buttons, switches, and levers are generally controlled by using physics joints, such as a Fixed Joint and Configurable Joint.
For example, a lever consists of a Grabbable part that is attached to a base via a ConfigurableJoint. That base could also be a Grabbable object. Whenever the player grabs the lever, a joint is attached, but is still constrained to the base.
Sometimes the Physics Engine can become unstable if certain conditions are met, so a helper script '/Scripts/Helpers/JointHelper.cs' is available that will help constraint objects to where they should be.
VR Hands
Hand models are independent from the Grabbers and can be easily swapped out in the editor or at runtime.
The demo scene includes an example of how to change out hands by clicking in the left stick.
See /Scripts/Helpers/HandControllers.cs for an example script you can use to animate a hand model based on input and Grabbable / Grabber properties.
Whenever a Grabbable is held, it's HandPose ID will be sent to the Hand Model's Animator. You can use this to animate the state of the hands while an object is grabbed.
Hand Poses
Custom Hand Poses can be assigned to each Grabbable. Hand poses work by setting a Pose ID parameter on the hand Animator whenever a Grabbable is held. These Hand Pose ID's are defined in HandPoseDefinitions.cs
To learn how to create custom hand poses, check out the second half of this excellent video by Valem :
Custom Hands start right around around 7m:35s
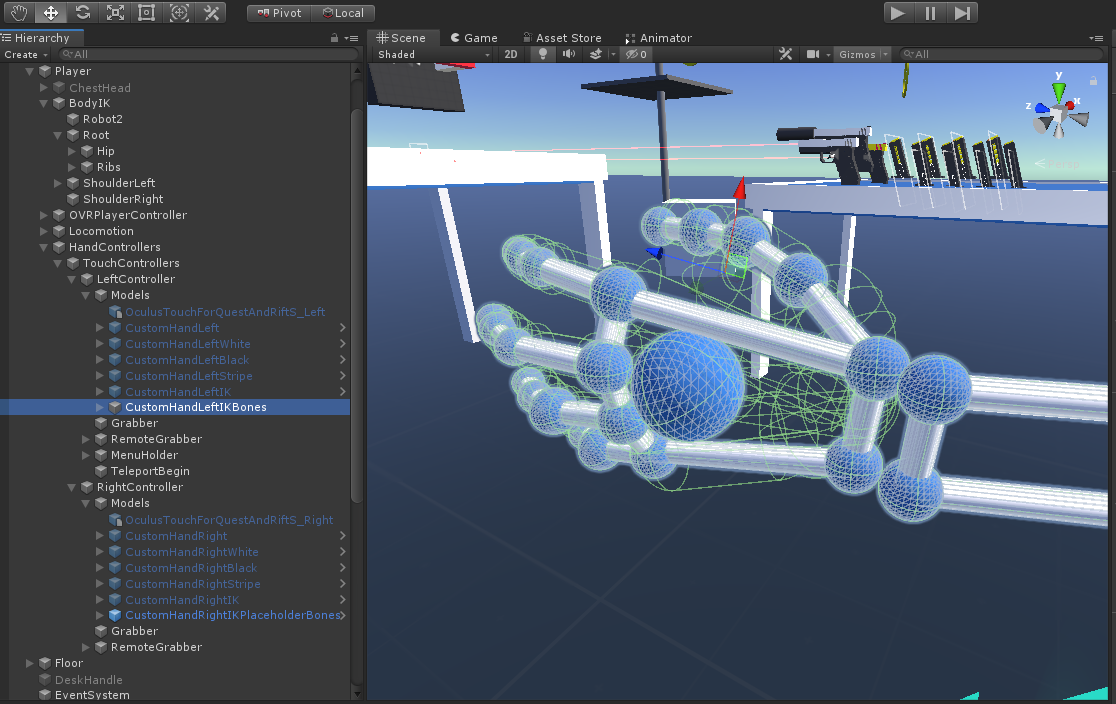
Arms, Head, and Body IK
The demo scene has a couple of examples of using arms, body, and head IK. These examples use the standard Unity IK system, but with a bit of trickery to get the hands and elbows to position correctly.
If you just use Unitys IK system then the characters hands won't always be able to reach where the controllers are, and finger IK isn't always rigged. To get around this, you can use a hand model as your controller. Then have your wrist model point at your characters elbow joint, and then an attached upper arm look at the shoulder joint. This way the hands always match with the controller, and the arms and elbows have targets to mimic.
Grabbable objects have a BreakDistance property you can set that can force a grabber to drop and object if it goes too far away from the object. This can be useful with arm IK as you can have the player just drop whatever it is holding if the Arm length would be too far. For example, if a player was holding onto an axe stuck in a tree and walked back, you could force them to drop the axe if they go too far, preventing the arms from being crazy long.
Take a look at /Scripts/Components/CharacterIK to see how hands and head IK are positioned / rotated. You can hide different parts of the body (such as arms or legs) by scaling their joints down to 0.
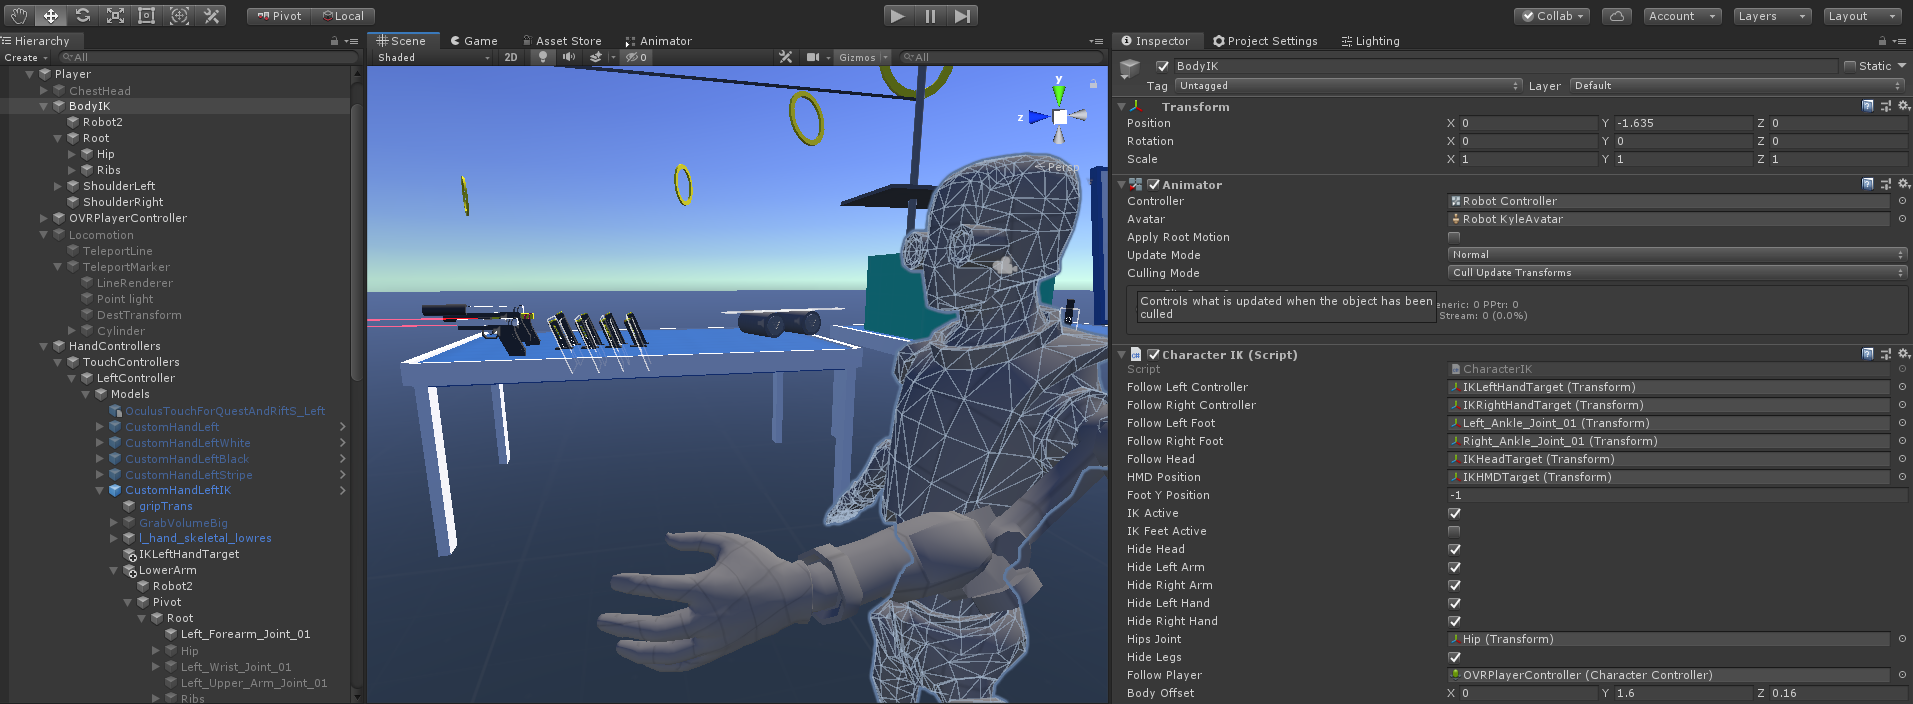
Body IK can be as simple as rotating (or Lerping) the body to match the HMD's rotation, offset with the characters rotation.
There is not yet a an example for feet IK, but this would involve setting the feet height to the player's lower capsule position.
Check out Final IKas an option for Full Body IK. Keep in mind IK can be a computationally expensive feature.
Grab Points
Grab Points allow you to specify multiple Transforms to be used as a grip when holding an object. For example, you may want to grip a knife by different positions or angles on the handle, depending on where the users hand is when it is grabbed. You can even specify a different hand pose depending on where the object is gripped.
Grab Points are Transforms that can be assigned to a Grabbable's "Grab Points" property. You can as many Grab Points here as you need, and the closest one to the grabber will be used when the object is grabbed.
For finer control, you can add the "GrabPoint" script to the Transform. Here you can specify a different HandPose to use when this Grab Point is being gripped.
You can also specify a rotation constraint, specified as "Max Degrees Difference Allowed". If the angle between the hand and the grabpoint is greater than this value, then this grab point will not be considered valid.
The knife prefab includes multiple grab points and is a good example to inspect. You can grab the knife with the blade facing up or down, depending on which way the hand grabbed it, by using rotation constraints.

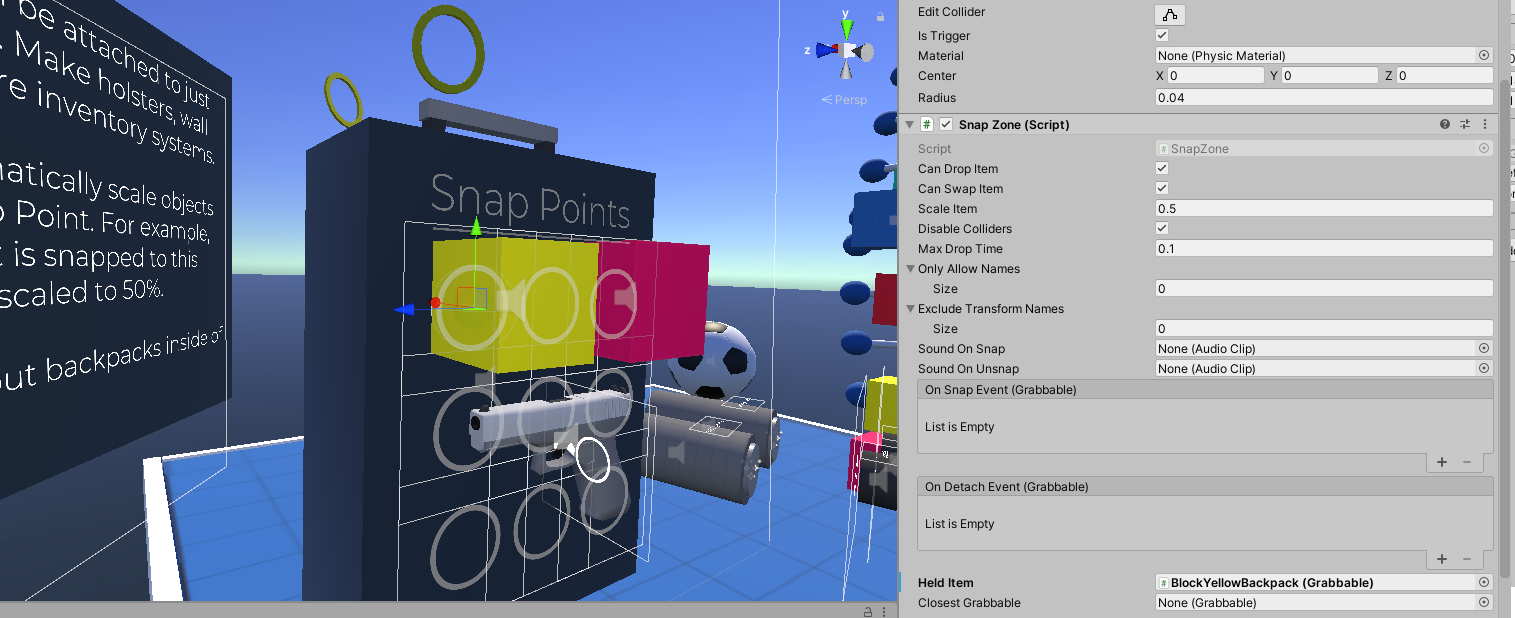
Snap Zones
Snap Zones are triggers that can "grab" objects if they were recently released from a Grabber. You can use these to create inventory systems, attachment systems, or just snap objects together.
When an object is inside a SnapZone it's colliders are disabled. This is to prevent the physics of this object from interacting with the world and causing things to go crazy. In order to grab the item back out of the SnapZone, the snap zone's trigger responds to the grab event.
Objects are positioned at 0,0,0 local position and rotation by default. You can add the "SnapZoneOffset" component to a Grabbable if you wish to specify a custom offset.
In addition to the "SnapZoneOffset" component, you can also add a "SnapZoneScale" component, to modify the scale of the Grabbable when inside the snap zone.
If you are using a player inventory / toolbelt type setup, you can attach the "ReturnToSnapZone" component to a Grabbable, and specify which SnapZone to return to when not being held. You can also specify a return speed and delay.
For example, you could have a toolbelt with knives that will automatically return back to the toolbelt after thrown - just set the ReturnDelay to something like 1-2 seconds.
Slow Motion
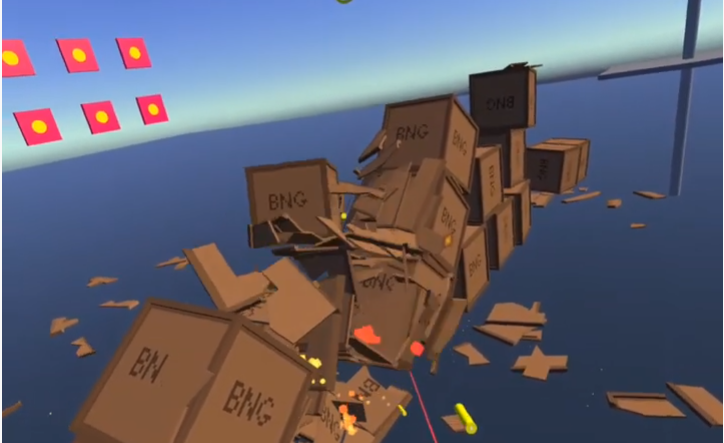
Slow motion is a fun effect in VR, and can also be a helpful way to troubleshoot physics and gameplay bugs.
In the demo scene you can slow time by pressing the "Y" button on the Left Oculus Touch Controller. Try shooting weapons, throwing objects, and observing sounds while time is slowed.
See /Scripts/Extras/TimeController.cs for an example on how to slow down time and apply a sound effect.

Whenever you are playing a sound, be sure to multiply your sound pitch by Time.TimeScale. This way your sounds will be "slowed" down by decreasing pitch, relative to how you've scaled Time.TimeScale.
When adding forces to rigidbodies use ForceMode.Velocity. This will properly scale based on Time.fixedDeltaTime. Otherwise physics may not work as expected.
Dealing and Taking Damage
There is a very simple damage system included that can be easily extended to work with your own custom setup.
A "Damageable" component has a health value. Damage can be dealt to it by calling it's DealDamage(float damageAmount) method. Once this value is <= 0 then the "DestroyThis" method will be called.
The "DamageCollider" component can be added to colliders. Whenever this collider collides with an object that has a Damageable component, the specified amount of damage will be dealt.
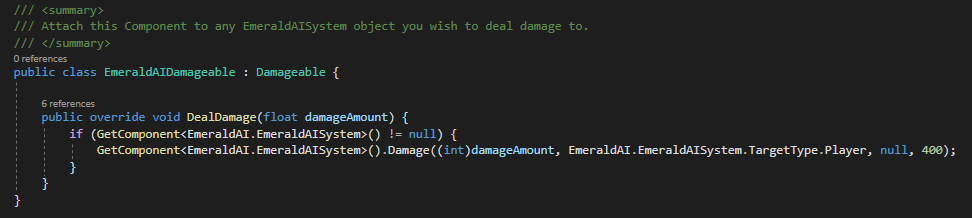
If you want to integrate with another damage system, just override the "DealDamage" method and pass along the damage value. Here is an example of how to integrate with EmeraldAI's damage system :
Integrations
VRIF contains multiple integrations with other Unity assets :
SteamVR
SteamVR SDK Support is currently experimental. If you require Steam device support (such as Valve Index or HTC Cosmos) you may use the OpenVR plugin along with XR Plugin Management, or the SteamVR SDK.
If you want to give SteamVR a go, this integration package can get you started. It includes SteamVR bindings you can use to map SteamVR actions to raw inputs that the InputBridge can read.
Installation instructions found here.
Note : This essentially maps SteamVR Actions such as "Grip", "Trigger", etc. so that the InputBridge can convert it to be used as raw input. It's not how SteamVR's input system is intended to be used, but is currently the only way to get input from certain devices until Unity gets full OpenVR or OpenXR support.
Check out InputBridge.cs to see how Steam Actions are bound to inputs
Oculus Integration
The Oculus Integration shows how to integrate Quest Hand Tracking. There is a demo scene included that shows how to draw using hand tracking, as well as a sample scene with a player that uses Oculus OVR components, such as OVRManager.
First install the Oculus Integration asset. Then extract the integration package found at "/BNG Framework/Integrations/Oculus Integration". Finally, enable the integration by navigating to Window -> VRIF Settings and enabling the Oculus Integration checkbox.
After extracting the integration package you can check out the included demo scene for the Oculus player or Quest Hand Tracking.
FinalIK
Final IK allows you to setup a character with full body IK. Full body character in VR can be tricky, but this integration should get you up and running with a pre-build FinalIK character quickly.
Installation Instructions :
- Extract the oculus integration package example that FinalIK provides, found in : "Plugins/RootMotion/FinalIK/_Integration/Oculus (Unity, Oculus Integration).unityPackage"
- Now extract the FinalIK Integration package that this package (VR Interaction Framework) provides, found at : "BNG Framework/Integrations/FinalIK.unityPackage"
After installation, you can run the demo scene that was just extracted into this directory (VRIK.unity). This scene contains a mirror and a few simple items so you can test out how IK works.
Two-handed weapons are not currently supported due to how VRIK positions it's hands. Please let me know if you would like to see that feature in the future, and what other features you would like to see in this integration : beardedninjagames@gmail.com
VRIK Documentation from RootMotion can be found here : http://www.root-motion.com/finalikdox/html/page16.html">Root Motion Docs
Please follow the Youtube video below for step-by-step instructions on how to set this up :
Emerald AI
In order to damage Emerald AI objects, you need to pass along the damage amount from the VR Framework to the Emerald AI system.
To do this :
- Extract the EmeraldAI.unityPackage found in /Integrations/EmeraldAI folder
- Attach the EmeraldAIDamageable Component to any object you wish to deal damage to
- Create a new Tag called something like "PlayerController" and assign it to your player's "PlayerController" transform. Specify this newly creataed tag in the Emeral AI detection settings. Otherwise the AI may be unable to detect you.
- Make sure any RaycastWeapons (such as the Pistol) have their "Valid Layers" set to include whatever Layer the Emerald AI objects are set to. Otherwise your Raycast shots will go through the AI targets.
That's it! If you are having issues with Emerald AI detecting the player or receiving damage, make sure you double check the tags and layers are correct and that the EmeraldAIDamageable component has been added to the enemy.
EmeraldAI documentation can be found here : https://docs.google.com/document/d/1_zXR1gg61soAX_bZscs6HC-7as2njM7Jx9pYlqgbtM8/
Please follow the Youtube video below for step-by-step instructions on how to set this up :
PhotonPUN v2
VRIF contains an integration package for PUN that will demonstrate how to connect and a server, sync the head and hand positions, as well as sync hand animations state.
Installation instructions :
- Download and import the PhotonPUN package from the asset store : https://assetstore.unity.com/packages/tools/network/pun-2-free-119922
- Make sure to create and enter your AppID in the PhotonServer Settings. (Window -> Photon Unity Networking -> Highlight Server Settings).
- Extract the PUN.unityPackage file found in BNG Framework/Integrations/PUN/
- Run the included demo scene and connect additional clients.
- Check the included Readme.txt file in for notes on how this works.
Tips & Tricks
A collection of useful information :
Upgrading to New Versions of VRIF
Upgrading to new versions of any Unity Asset can feel like a daunting task. Below are a few tips to ensure you don't lose work and make upgrading as painless as possible.
-
First and foremost : Back up your work. The best way to do this is to use source control, such as the free and excellent Github.
If things don't work quite right, you can always revert back to your previous commit. This is also a good way to see what has changed in the script files since the last version.
-
Keep your own Player Prefab. The Player prefab that comes with the framework may change from time to time as features are introduced. If you make modifications to the included player prefabs, make sure you save your own prefab copy. This way your settings won't get overridden, and you can inspect the included player prefabs for any changes.
-
You don't need to import the project settings every time. These are included mostly for first time installs. If your project is already setup properly, you can skip this step by deselecting the ProjectSettings files at the bottom of the asset import.
Common Issues and Fixes
-
Getting poor performance or strange visuals when running in the editor.
- Fix : Make sure nothing is selected in the Inspector during runtime as this can kill your framerate. Better yet, set the Game window to "Maximize on Play".
-
Can't shoot the bow properly and two-handed weapons behave poorly when close to the face.
- Fix : Make sure the "Player" and "Grabbable" layers are ignored in the Physics Collision Matrix (Edit -> Project Settings -> Physics)
-
Can't grab an item or climb an object
- Fix : Make sure the "BreakDistance" property of the Grabbable / Climbable is larger than the collider. Alternatively, set "BreakDistance" to 0 to disable this feature.
-
Can't interact with a UI Canvas
- Fix : Make sure the Canvas has an EventCamera assigned, the OVRRaycaster component is assigned to the Canvase, and that the OVRInputModule is on the EventSystem.
Tips & Guidelines
- Keep all of your objects at a 1:1 scale. If you were to scale a cube to 1, 2, 1, then remove the box collider and recreate it in a parent object that has a uniform scale. Otherwise weird things can happen with physics objects, such as floaty gravity, objects that fly out sporadically, and other glitchy behaviour.
- Play with adjust your Physics Timestep (Project Settings -> Time -> Fixed Timestep) to something such as .01388889 or 0.01111111. Physics may not run as fast as your framerate, so you may want to adjust this to the headset you are targeting.
- There is an object highlight script included, but it is not enabled by default as it has poor performance on the Quest. For Rift, you can enable this by enabling the "OutlineCamera" object in the CenterEyeAnchor
- Move linearly to increase player comfort. Acceleration can cause motion sickness.
- Having a button to slow down time can give you some extra time to see how physics objects are interacting and debug any issues with joints or other behaviours.
- Use VRUtils.Instance.Log(“Message Here”) to log information to the menu attached to your characters hand. This can be a helpful way to see Debug information without having to take off the headset.
- If you are getting weird eye level positions on the Quest, make sure that "Floor Level" is checked under the OVRCameraRig.
- You can use the Oculus Link to Debug the Quest from within Unity. Just make sure the "Oculus Desktop Package" is added and you have the Oculus app installed. You can also use an app such as Virtual Desktop, which will let you connect wirelessly through SteamVR.
- If all of your materials are pink, then you are probably using a newer Render Pipeline and need to upgrade your project's materials : Edit -> Render Pipeline -> Universal Render Pipeline -> Upgrade Project Materialst
- If you are finding your held objects collide with your player capsule, set your "Player" physics layer to ignore the "Grabbable" layer (Project Settings -> Physics -> Layer Collision Matric). This way objects will pass right through the player capsule. If you still need some sort ofplayer collision, add hit boxes on a separate layer - i.e. for the head.